
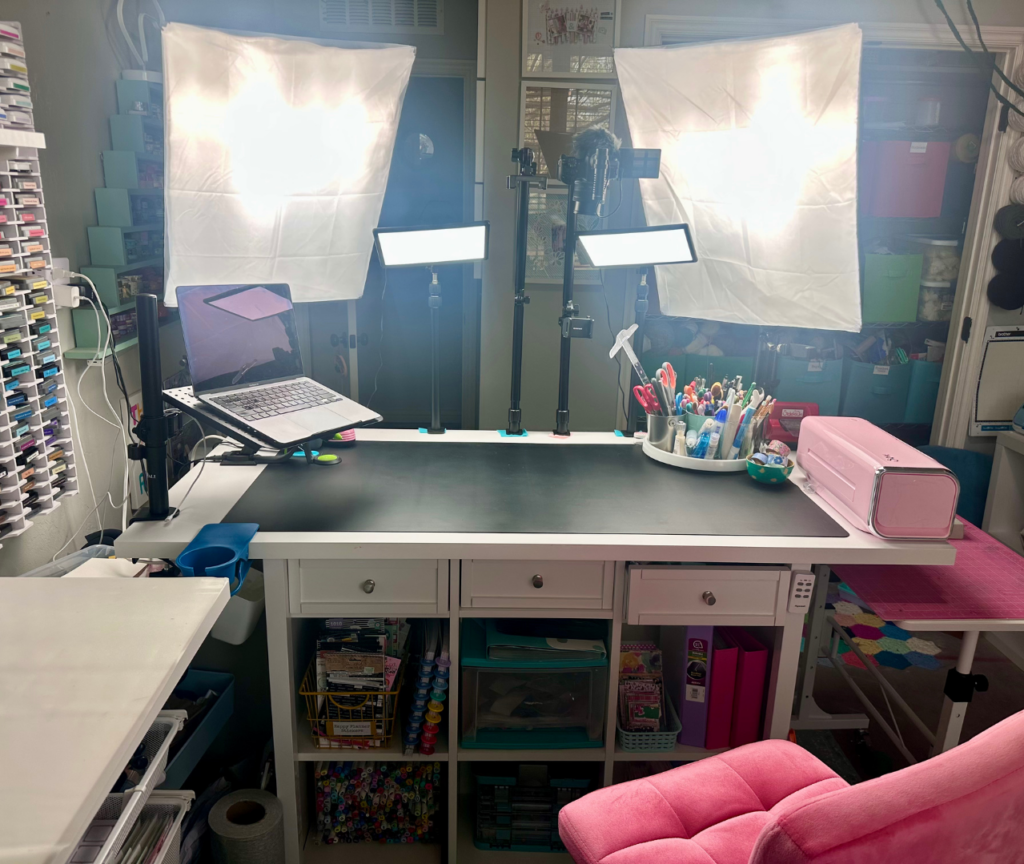
If you’ve been trying to figure out how to film craft videos, you’ve probably noticed two extremes:
super high-end studio setups… or people balancing their phone on a pile of books.
I’ve tried a little bit of everything – and landed somewhere in the middle. I realize this is a bit off topic when my whole goal is to help you log off a little and craft – not everything has to be filmed and not everything has to be shared. But because I get a lot of questions about it, I’m sharing how I film craft videos today.
This is my exact craft video setup for filming both YouTube tutorials and short-form content like Reels and TikToks. It’s not the cheapest setup, but it’s also not over-the-top – and most importantly, it’s sustainable to use consistently.
As an Amazon Affiliate, I earn on qualified purchases.
Go here to watch the video with easy to shop product links: CLICK HERE TO VIEW
My Craft Video Setup (Step-by-Step)
If you’re building your own craft filming setup, these are the core pieces I recommend focusing on.
1. Start with a Functional Craft Table
Your table is the foundation of your entire craft video setup. This is where I finally did a little splurging after years of using makeshift tables and surfaces. I could have saved a lot of money if I’d just gone ahead and gotten a good one.
This is the Sauder Craft Pro Series Craft Table. It’s enormous with great cubbies and drawers and can be used by two people at a time if needed.
You don’t need anything fancy, but you do need enough space to:
- Work comfortably while filming
- Keep your materials in frame
- Avoid constantly bumping your camera or lights
A cramped table will make filming craft videos way harder than it needs to be.
2. Use a Black Anti-Glare Mat for Better Visuals
This is one of the most underrated tools for filming craft videos.
I use a black silicone mat for kitchens because it:
- Protects my table surface
- Reduces glare from lighting
- Is easy to wipe clean
- Helps my materials stand out on camera
If your videos feel flat or visually cluttered, this small change can make a big difference.
3. Lighting Setup for Craft Videos (This Matters Most)
If you’re researching how to film craft videos at home, lighting is the most important upgrade you can make.
My setup includes:
- Two Newer video light panels mounted to my desk
- Two softbox lights for overall brightness
This combination helps:
- Eliminate harsh shadows
- Keep lighting consistent (no relying on natural light)
- Show true colors in your materials
Better lighting = more professional-looking craft videos, even with a simple setup. It took me a long time to get this right and TBH I do still sometimes struggle because of the space I have around the desk to arrange the lights.
4. Overhead Camera Setup for Craft Videos
For my main filming, I use:
This gives me a clean, stable top-down angle, which is essential for most craft tutorials.
If you’re serious about long-form content like YouTube, having a dedicated camera can be worth it – but it’s not required when you’re just starting out.
5. Filming Craft Videos with Your Phone (Reels + TikTok)
I also use a second overhead rig for my phone.
This allows me to easily film:
- Instagram Reels
- TikToks
- YouTube Shorts
Having a separate phone mount means I don’t have to constantly adjust my main camera setup, which saves a lot of time when batch filming.
6. Use a Laptop Stand to Improve Framing
This is one of my favorite workflow upgrades.
I use a laptop stand to mirror my iPhone screen so I can:
- Check my framing in real time
- Keep my hands and materials centered
- Avoid filming clips that don’t work
If you’re filming craft videos alone, this makes a huge difference.
The Reality of Craft Filming Setups
A lot of creators will show you very expensive setups. Others will tell you to just “use what you have.”
The truth is – you can do either.
I chose a middle-ground craft video setup that:
- Doesn’t require a full production studio
- Isn’t frustrating to use
- Works for both long-form and short-form content
Because the best setup isn’t the fanciest one – it’s the one you’ll actually use consistently.
How to Film Craft Videos (Beginner Version)
If you’re just starting and don’t want to invest much yet, here’s a simple version:
- Use your phone
- Film near a window or add one light source
- Use a clean, neutral background
- Stabilize your camera (even a basic mount helps)
You can always upgrade your craft video setup as you go.
Final Thoughts on Filming Craft Videos
If you’ve been overthinking your setup, this is your sign to simplify it.
Focus on:
- Good lighting
- A clean filming surface
- A stable overhead angle
Everything else can come later.
Because at the end of the day, the goal isn’t to have the most impressive setup – it’s to actually create and share your craft videos consistently.